
Introducing FedML Octopus: scaling federated learning into production with simplified MLOps
Detailed instructions of a simple ML training demo for a first time FedML user.
Table of Contents
Overview
Federated Machine Learning Overview
This Demo: An Introductory “Hello World” Example for FedML Octopus MLOps
FedML's Workflow and Objects
Prerequisites
Steps:
1. Install FedML
2. Download our FedML Repository from GitHub
3. Build client & server package files for the Model Application
4. Build a Model Application
5. Setup an Edge Device or Silo
6. Setup a Server
7. Build a new Project in FedML Octopus & MLOps
8. Build a new Run within your Project and Train your model
9. Check the Training results
10. Add more Edge Silo machines
Follow up exercises
Appendix
Overview
Welcome to FedML Octopus! In this blogpost, we demonstrate how to start using FedML Octopus MLOps solution to run several rounds of federated training and aggregation for a machine learning model through an Image Classification demo. The demo is intended for a first-time FedML Octopus MLOps user. The detailed instructions and No-Code approach are suitable for a researcher, engineer, solution architect, data scientist, or business stakeholder with CLI access. The result is a federated machine learning training run on a client and server you’ll set up. With the pre-requisites in place, this demo should take less than 20 minutes end-to-end.
The goal is 3 fold:
- Learn the components & flow of the FedML MLOps federated machine learning solution
- Have FedML up and running
- Train the demo model on your edge silo devices
Federated Learning Overview
Federated machine learning has applications in many fields, incuding logistics & retail, healthcare, autonomous vehicles, recommendation & ranking products, smart city, fin tech, and generative AI. Federated learning allows AI technologies to learn from personal or private datasets without centralizing or transferring or pooling the data.
The FedML platform brings zero-code, lightweight, cross-platform, and secure federated learning out of the lab and into the hands of businesses everywhere. And FedML supports any ML or AI model from: the simplest logistic regression to neural networks to large modern foundation models like LLM.
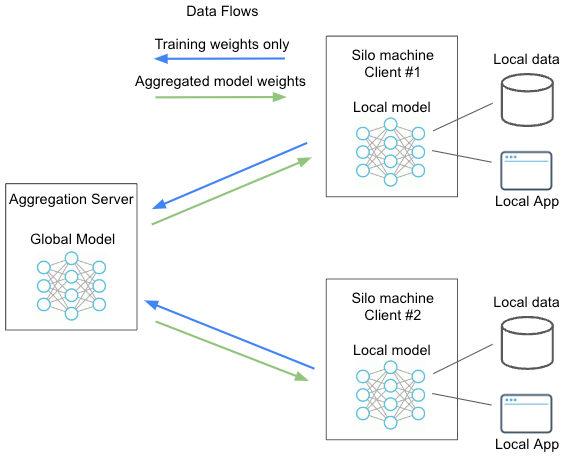
The following diagram represents a typical federated machine learning setup on FedML. Simplified here with only 2 clients or silo machines. The aggregation server and silo machines can be any machines you own and can be behind your firewall. The model is sent to the data, rather than traditional ML setup where the data is centralized or pooled for a central model. Hence, the local data never leaves the local model & local storage for training. Only the weights are transmitted back to an aggregation server, which aggregates the weights and delivers an updated global model back to the silo machines for additional rounds of training.
This Demo: An Introductory “Hello World” Example for FedML Octopus MLOps
Federated machine learning is all about distributing the machine learning to many machines and having an aggregation server to aggregate the learnings and redistribute the model back to the client machines. For this introductory HelloWorld-type example, we'll do both the training and the aggregating on your 1 laptop. That is, we'll setup only 1 client edge machine (or silo) for the "edge training" and an aggregation server, both on your laptop, and we'll mention a follow up on how to add more clients for FedML's MLOps to orchestrate learning across.

This demo's machine learning model will come from our pre-packaged open source repository, which includes a Logistic Regression model implemented in PyTorch, and we'll train on the MNIST numeral image data. FedML is capable of much more advance models and data sets but we'll keep it simple here so you can see the end-to-end quickly. We'll use FedML's MLops user-interface to orchestrate the training and review the model's performance.
FedML has several product lines. This demonstration will leverage FedML's Octopus cross-silo federated learning product. The demo involves a control plane comprised of a hybrid of CLI (command line interface) and a Web based GUI for the MLOps and performance monitoring, and a compute plane which we'll setup to run on your laptop. The control plane handles everything involved with establishing & enforcing the process and policy. The compute & data plane are everything involved with carrying out that process or policy.

For experienced MLEs using FedML for the first time, we think you'll quickly see that our MLOps solution: is easy to use, removes many typical bottlenecks typically associated with MLOps and federated learning, and can scale to any need. For SDE or data scientists less experienced with federated learning, you'll see how easy FedML has made it to deploy a model in a federated learning manner.
FedML's workflow and objects
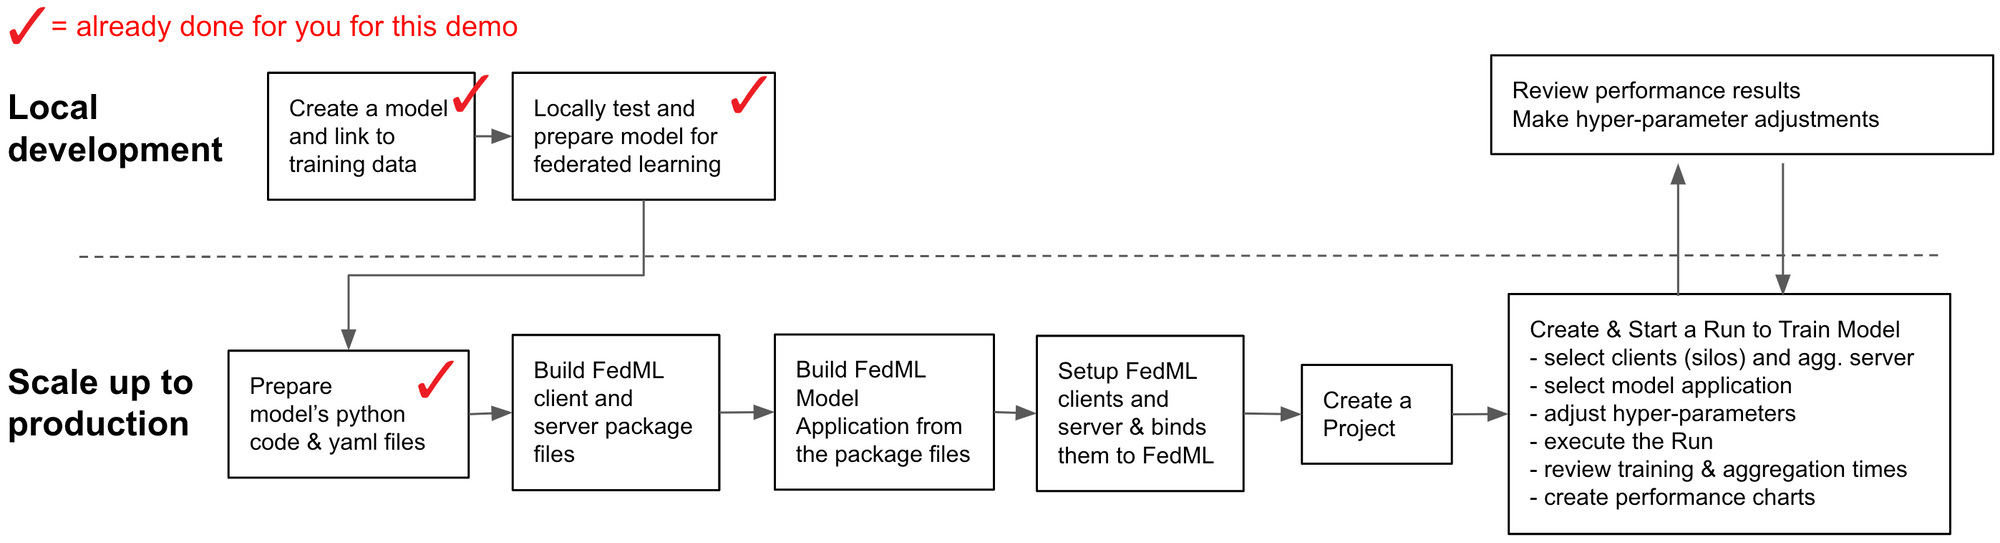
The following diagram illustrates FedML's training process for this blog's demo.
A Basic FedML workflow
FedML MLOPs Object Map:
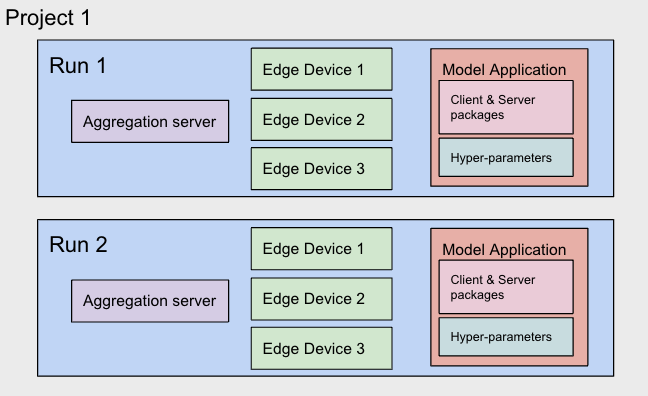
It's helpful to keep the following relationships on our MLOps platform in mind when building your first FedML demo. Each object in bold has more functionality, but we've simplified here for the demo.
- Your FedML account can have many Projects
- A Project can have many Runs. A run is a training job which trains on a specific set of hyper-parameter values.
- A Run has: 1 aggregation server, 1 Model Application, 1 or more clients (or edges), and a set of hyper-parameters
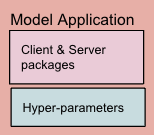
- A Model Application has: a client package, a server package. These contain your model code and information on where to get the training data for each client. The Application also has default hyper-parameters, and 0+ additional hyper-parameter configurations.
Our FedML MLOps Web GUI makes it very easy to add and experiment with new Runs to try variants of your model, or hyper-parameters, or edge devices.
Prerequisites
- a FedML.ai account. Sign up here https://www.fedml.ai/
- FedML officially supports x86_64, aarch64 (ARM) for Linux, Windows, and Apple/Intel, and we also support Apple silicon M1/M2. You only need 1 machine for the demo. We'll setup both the federated server & client there.
- a Terminal, Console, or command line interface access.
- a browser for running FedML's MLOps web UI to manage your training
- 8 to 16GB RAM memory available to use.
- RAM is important. Not just total 16GB RAM on your machine, but it must be 8-16GB available to use.
- If your client edge devices log out on their own during training, it's an indication that you don't have enough RAM available to run FedML training.
- If your laptop doesn't have enough RAM, you may try using our Fedml Colab Notebook or you may use any cloud machine to run this demo.
- Python 3.7+
- GitHub via git command
1. Install FedML
This requires you have Python installed, which includes pip. Success for this step is the ability to run fedml command successfully on your machine.
Open a new Terminal or Console. If you are on a Mac, you need xcode, type:
xcode-select --install
This will check if Xcode is installed, and if it's not found, it will be installed. Then on Mac or Windows type:
pip3 install fedml
Installation time will be a few minutes, depending on your network. When it completes, check the last few lines of the output in your Terminal window. It should let you know where FedML is installed. If there are errors or the install is not completing, there may be issues with your Python install. See the Appendix of this blog post for some suggestions.
We'd like to run the fedml command from anywhere, hence you need to add it to the system path. For example, the output from your pip install may say that fedml is installed at /Users/[yourusername]/Library/Python/3.9/bin. Or it may be different. Another way to tell where FedML was installed, is to use the which command:
which fedml
Add fedml to your path PATH. Please change the following to whichever path you find fedml installed at::
export PATH=$PATH:/Users/[yourusername]/Library/Python/3.9/bin
Try the following 3 fedml commands to ensure fedml is working ok. The first displays our fedml command options, the second shows the fedml environment, and the third the version:
fedml --help
fedml env
fedml version
If the fedml commands shown above don't work, check your PATH value includes the path to fedml. Also double check you are running Python 3.x, and confirm Python is executable from your current directory.
2. Download our FedML Model Repository from GitHub
Our FedML GitHub repository has many example models and data for training.
Go to a directory on your Terminal at which you would like to download our FedML model's GitHub repository. Success for this step is having the FedML Github repository on your machine and you can get to the Python examples one_line directory.
For this demo, we'll use a logistic regression model, trained on the MNIST data set, with the federation communications over MQTT. MQTT is a lightweight messaging protocol that is well-suited for machine to machine applications. FedML also supports gRPC, MPI, PyTorch RPC protocols. And FedML supports much more advanced models, including LLMs, but we use a logistic regression here simply for the speed of completion of the demo. The federated training setup will be a cross-silo type, which is orchestrated by our Octopus and MLOps products. FedML also supports cross-device federated learning, on smartphones, with the FedML Beehive product.
git clone https://github.com/FedML-AI/FedML
cd ./FedML/python/examples/cross_silo/mqtt_s3_fedavg_mnist_lr_example/one_line
If you can't cd into the FedML repository clone, check that you used the correct GitHub url and double check you're trying to access the correct new fedml repository directory.
3. Build client & server package files for a Model Application
In a real world FedML deployment, you'll build a model with a standard framework such as Pytorch, prepare training data, and setup a yaml file to inform FedML how to implement your model. In this demo, we'll leverage our FedML repository, which has already done this for you for a collection of models and data sets.
Confirm you are in the FedML repository directory: FedML/python/examples/cross_silo/mqtt_s3_fedavg_mnist_lr_example/one_line. If not there, go there.
It's important to be at the correct demo model directory, as the following steps will create a new mlops subdirectory there. MLOps uses a client and package file to orchestrate the training with devices bound to MLOps. First, build a deployable FedML client package using the fedml build CLI:
SOURCE=client
ENTRY=torch_client.py
CONFIG=config
DEST=./mlops
fedml build -t client -sf $SOURCE -ep $ENTRY -cf $CONFIG -df $DEST
The Terminal view should show some activity and end with something like this:
Argument for destination package folder: ./mlops
Now, you are building the fedml packages which will be used in the MLOps platform.
The packages will be used for client training and server aggregation.
When the building process is completed, you will find the packages in the directory as follows: ./mlops/dist-packages.
Then you may upload the packages on the configuration page in the MLOps platform to start the federated learning flow.
Building...
You have finished all building process.
Now you may use ./mlops/client-package.zip to start your federated learning run.
Next, build a deployable FedML server package
SOURCE=server
ENTRY=torch_server.py
CONFIG=config
DEST=./mlops
fedml build -t server -sf $SOURCE -ep $ENTRY -cf $CONFIG -df $DEST
The Terminal view should show some activity and end with something like this:
Argument for destination package folder: ./mlops
Now, you are building the fedml packages which will be used in the MLOps platform.
The packages will be used for client training and server aggregation.
When the building process is completed, you will find the packages in the directory as follows: ./mlops/dist-packages.
Then you may upload the packages on the configuration page in the MLOps platform to start the federated learning flow.
Building...
You have finished all building process.
Now you may use ./mlops/server-package.zip to start your federated learning run.
Check for the 2 new package files. Later, you'll upload these into your Model Application in MLOps Web UI.
cd mlops/dist-packages
ls -l
Confirm client-package.zip and server-package.zip are there before moving on.
4. Build a Model Application
For this step, we'll use the Web GUI. A Model Application encapsulates 1) the client & server packages which describe the model and instructions on where to fetch training data on the clients. The Application also contains a set of hyper-parameters.
MLOps will orchestrate the client & server packages for training across the server and the distributed clients or edges. In a production implementation, the training data is located with the edge or client device or behind a firewall with the client device, and that training data is not shared with FedML or others in federated machine learning process.
In our simple demonstration example here, each client will fetch the MNIST data set from storage we've setup ahead of time. Each client will use MNIST data for training.
- Go to https://fedml.ai, create an account if you don't have one, sign in.
- Under Train on the Edge, select FedML Octopus
- Click on My Applications in the menu. It should display an empty list. We'll use the 2 package files you created in Step 3 above for assembling this Model Application.
- Click +New Application
- Type in an Application name, e.g. LR MNIST demo
- Skip the home page picture
- Click any industry tag (doesn't matter which for demo)
- Click a Task tag, like Image classification.
- Skip the description and github link parts.
- Under the Packages section, for client, click the upload icon, find your client-package.zip on your local disk as created in the Step 3 process, and select it
- Under the Packages section, for server, click the upload icon, find your server-package.zip on your local disk as created in the Step 3 process, and select it
- Take a peak at the hyper-parameters Original block.
- At Hyper-parameters Configuration, click Add
- Type a new configuration a name like: comm_round 50
- Scroll down in the hyper-parameter window to find comm_round and edit its value to 50 (its 3 by default). Click OK. That will create a new tab named comm_round 50. (Note: we're using 50 rounds because that will get us near 80% accuracy later)
- Whenever you leverage this particular application in the future, it will default to 50 rounds of training. But you can alter this hyper-parameter again later when setting up a new Run.
- Click the Create application button
Great! You've created a re-usable model application you can leverage for any Project and Run in the future.
5. Setup an Edge Device or Silo
For this step, we'll use both the Web GUI and the CLI. You should be in Octopus on the web.
- Back on your browser, make a note of your numeric Account Id shown in the upper right corner of open.fedml.ai.
- Click on Edge Device in the left menu. It should be an empty list.
- Next we'll set up your machine as a client or edge device. Click back over to your Terminal window (CLI) and log your machine into fedml as a client with your account id. This is also called binding your machine. Type our login command:
fedml login [account id]
You'll see some output in the Terminal like the following.
Congratulations, you have logged into the FedML MLOps platform
successfully!Your device id is [abcd123]. You may review the
device in the MLOps edge device list.
Return to the browser and the Octopus > Edge Device page and click the refresh icon or reload your browser window. You should see a new Device ID added, with a name, OS, etc. Status should indicate Idle in green.
6. Setup a Server
We'll also set up the aggregation server on your machine or laptop (your 1 machine can run both a client and a server). Start a new Terminal window or new tab in Terminal. Log your machine into fedml with your account id, using the -s option this time (s = server)
fedml login -s [account id]
You'll see some output in the Terminal. Return to the browser and the Octopus > Edge Device page and click the refresh icon or reload your browser window. You should see a new Device ID added, with a name, OS, etc. The name is prepended with [Aggregation Server]. Status should indicate Idle in green.
7. Build a new Project in FedML Octopus & MLOps
A Project is a top level object in FedML Octopus. A Project can consist of multiple Runs. Each run is a training session.
- Back at the browser, in Octopus, click the Project left-menu item. You should see an empty list. Then click +Create New Project
- For Group name, select the default group (which is you)
- Type a Project name like My First Project. Click OK.
8. Build a new Run within your project. Train your model
A Run is like a "job" that represents a model training cycle as described in the model application's hyper-parameters. The FedML platform executes the Run to orchestrate the many moving-parts involved with training your model on 1 more many edge devices.
Starting from the Project list:
- Click on your newly created project name.
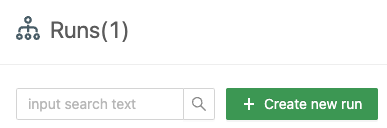
- Click +Create new run.
- You'll see a list of Edge Devices and a list of Aggregation Servers.
- Your newly logged-in client or edge device name should appear under Edge Devices and it should be selectable.. Select it.
- Your newly logged-in server name should appear under Aggregation Servers and it should be selectable.. Select it.
- Click the Application drop down, you should see the Model Application you created listed. Select it. It will indicate the package files are loaded and show you the default parameters.
- click Start
- Your terminal windows with the client and server running have show some activity as FedML starts up the client and servers there. If they are not showing any activity, it may be because you don't have enough RAM available to run a training. If no activity, check that you have between 8 and 16 GB RAM available. Or see Appendix for additional help.
- in the Run view in the browser, click on the Training Status tab.
- You'll soon see training progress advance and it should be done in < 1 minute. You'll know it's done when the Server and client Device indicate Status = Finished
9. Check the Training results
Training performance metrics are specified in your model's code in your package files. For this logistic regression model application, we've already included an accuracy and a loss metric.
- in the Run view in the browser, click on the Results tab.
- Click Add Panel
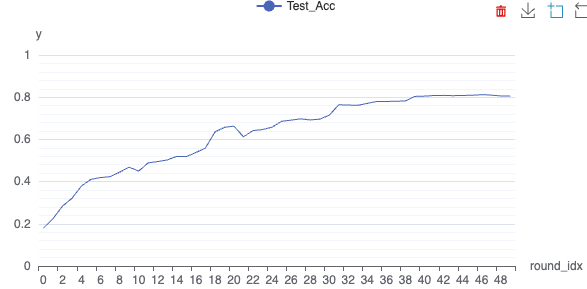
- for X select round_idx (training round)
- for Y select Test_Acc (accuracy). Click OK
- See how the training accuracy improved with each round. With 50 rounds of training on 1 client edge device, the accuracy usually peaks at about 0.80
Congratulations! You've completed your first training run on FedML's federated learning and MLOps platform !!!
Add More Edge Silos
Want to add more edge silos? If you have another laptop, or a colleague who can help out, you can expand this demonstration by easily adding another silo or edge device on their machine by simply running 2 commands there:
pip3 install fedml
fedml login [your account id]
Then continue on step 8 to create another run on your main laptop web UI. You'll then select 2 devices in step 8.5, yours and the new client edge.
Follow up training exercises
There are a number of follow up activities you can try to continue learning FedML's training platform. Such as:
- Add more clients or edge devices. Load fedml onto other machines,
** On new machine, see step 1 - Install FedML
** Run fedml login [account_id] from the new client machine. This binds the machine to your MLOps.
** Setup a new Run in the Web UI. You can select the multiple edge devices which are bound to your [account id], and your new device should be listed there. MLOps will handle all the training orchestration. In Federated Learning, more clients also typically means improved model performance. See our documentation - Add a Collaboration Group and Collaborators. These are colleagues whom you'd like to have participate in viewing your training runs. They may also provide more silos or edges for you, but it's not required. A collaborator can just view if they like.
- To simulate multiple client or edge devices on your laptop, use Docker to add multiple containers on your machine. Load the Docker Hub's FedML Image as create a few containers (as your machine allows). We have both a light weight and more heavyweight (for GPU) image on Docker Hub). Our Docker FedML install (and other FedML install options) docs are here on GitHub. Once in the container's interactive mode, fedml is already installed there and you can simply fedml login [account_id] from each containter.
- Try this blog's similar flow but for a different model in the FedML model repository
- Implement your own model and data, and build client & server package files for it and create a Model Application from these. More info at GitHub https://github.com/FedML-AI
Coming soon... a Blog post about serving or inference on FedML.
Appendix
Python setup issues handling
If you have issues with pip install fedml command completing successfully, here are some things you can try:
- try the alternative command:
pip3 install fedml
- If neither pip nor pip3 work successfully, it’s possible you don’t have Python on your machine. Try command:
python --version or python3 --version
If it shows a Python version, then return back to the install FedML step above. You should not need to proceed with Conda below.
If there is no python version returned, then you'll need to install Python on your machine, we recommend install it with Conda:
Conda install link: https://www.anaconda.com/download/ After Conda is installed, create a conda virtual environment called “fedml”. Virtual environments are a convenient way to isolate python installations associated with different projects. Active the environment the try to install fedml again.
conda create -n fedml python=3.8
conda activate fedml
pip install fedml
Then continue with Step 2 above.
-
If you prefer not to use your own laptop for the demo, please try our Google Colab instead. Once you completed setting up the package files and binded a server and client you can continue with Step 7 in this blog.
-
If you'd like to use your own laptop and are still having issues, on a Mac OS with M1/M2 chips and if you have previously installed Python with Homebrew, and the pip install command is failing then:
a) it’s possible there is an improper path setup issue created by homebrew
b) Please re-install Python on your Mac M1/M2 using Conda to install python 3.8+ and related lib on your device.Link: https://www.anaconda.com/download/
c) After installed conda, create a conda environment called “fedml”:
conda create -n fedml python=3.8
conda activate fedml
d) Update 2 files which control the environment path on your device to enable them to use Conda not HomeBrew:
(1) check your conda python/pip location (Named “fedml”) by using command:
conda env list
## fedml            * Your_Conda_Env_Location
Then your conda python/pip location should be concatenated as:
Your_Conda_Env_Location/bin
(2) Update your files ~/.bash_profile and ~/.zprofile, as the path to the python bin file needs to be the Conda Python file location. The way to do it is to add one line to the bottom of the ~/.bash_profile and ~/.zprofile.
PATH = "Your_Conda_Env_Location/bin:${PATH}
try to install FedML again
pip install fedml
e) If it has an error message related to library called “greenlet” or “gevent”, try to conda install them.
conda install greenlet
conda install gevent
try to install FedML again
pip install fedml